Layouts in Flutter
https://docs.flutter.dev/ui/layout
1. Placeholder
1
2
3
4
5
6
7
8
9
10
class Body extends StatelessWidget {
  const Body({super.key});

  @override
  Widget build(BuildContext context) {
    return const Placeholder(
      child: Text("data"),
    );
  }
}
StatelessWidget을 처음 만들게 되면 맨 처음 보이는 위젯이 Placeholder이다. 의미는 ‘이 위치에 어떤 위젯이 올꺼니까 그 위젯의 사이즈만큼 자리를 차지해라’ 라는 뜻이다.
2. child 객체의 위치
 flutter에서는 child 속성을 맨 마지막으로 배치하는 것을 권장한다. 아래
 Move chile properties to ends of arguments everywhere in file을 클릭하면 모든 chile 속성이 각 변수의 맨 끝으로 배치된다.
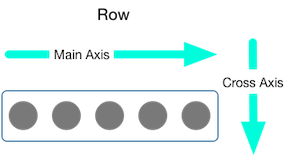
3. Column의 가운데 정렬 - Aligning widgets
Column은 Center 위젯으로 감싼다고 해서 가운데 정렬이 되지 않는다. Column의 속성 중에서 정렬을 할 수 있는 속성이 따로 존재하기 때문이다. 또한 Column에서는 좌우의 폭을 제한하지 않기 때문에 Container로 감싸야 정렬을 할 수 있다.

1
2
3
4
5
6
7
8
Container(
      width: double.infinity,
      child: Column(
        mainAxisSize: MainAxisSize.max,
        mainAxisAlignment: MainAxisAlignment.center,
        crossAxisAlignment: CrossAxisAlignment.center
      )
)
예를 들어, 위의 코드에서 Column은 상하만 배치할 수 있는 위젯이다. 만약 좌우로 가운데 정렬을 하고 싶다면 Container 위젯으로 감싼 다음에 width를 double.infinity로 선언해주면 된다. Row 일 경우에는 반대로 Row를 Container 위젯으로 감싼 후 height 속성을 선언하면 된다.
Column에서 CrossAxisAlignment.start 해줘도 그 안에 Row는 Row 위젯 안에서 선언한 MainAxisAlignment.center에만 영향을 받으므로 위의 그림과 같이 Column 내부에 Container만 영향을 받는다. 4개의 컨테이너 모두 왼쪽 정렬을 하고 싶으면 Row의 MainAxisAlignment.center를 MainAxisAlignment.start로 바꾸면 된다.
1
2
3
4
5
6
7
8
9
10
11
12
13
14
15
16
17
18
19
20
21
22
23
24
25
26
27
28
29
30
31
32
33
34
35
36
Column(
      mainAxisAlignment: MainAxisAlignment.center,
      crossAxisAlignment: CrossAxisAlignment.start,
      children: [
        Row(
            mainAxisAlignment: MainAxisAlignment.center,
            crossAxisAlignment: CrossAxisAlignment.center,
            children: [
              Container(
                width: 100,
                height: 80,
                color: Colors.red,
                child: Text("Container 1"),
              ),
              Container(
                width: 100,
                height: 80,
                color: Colors.green,
                child: Text("Container 2"),
              ),
              Container(
                width: 100,
                height: 80,
                color: Colors.blue,
                child: Text("Container 3"),
              ),
            ],
          ),
        Container(
          width: 300,
          height: 120,
          color: Colors.grey,
          child: Text("Container 4"),
        )
      ],
    );
4. 픽셀이 초과할 경우 SingleChildScrollView
SingleChildScrollView을 좌우, 상하로 컨트롤해서 스크롤을 만들 수 있다. Tap bar에서 자주 쓰인다.

Container로 이루어진 Column 축으로 정렬된 위젯들을 SingleChildScrollView 위젯으로 감싸게 되면 화면에서 넘친 픽셀들을 상하로 스크롤하도록 만든다.
반대로 좌우로 스크롤을 만들고 싶다면, Column을 Row로 바꾸고, scrollDirection: Axis.horizontal 속성을 선언한다. Container 안에 width가 double.infinity 선언으로 길이를 무한하게 설정해줬으니 스크롤 할 범위가 너무 길어서 한정된 영역으로 설정해야 한다. height과 동일하게 설정 후 margin을 vertical에서 horizontal로 바꾸면 된다.
1
2
3
4
5
6
7
8
9
10
11
12
13
14
15
16
17
18
19
20
21
22
23
24
25
26
27
28
29
30
31
32
33
34
35
36
37
38
39
40
41
42
43
44
45
46
47
48
49
50
51
52
53
54
55
56
SingleChildScrollView(
      child: Column(
        mainAxisAlignment: MainAxisAlignment.center,
        // crossAxisAlignment: CrossAxisAlignment.center,
        children: [
          Container(
            color: Colors.grey,
            width: double.infinity,
            height: 100,
            margin: EdgeInsets.symmetric(vertical: 8),
          ),
          Container(
            color: Colors.grey,
            width: double.infinity,
            height: 100,
            margin: EdgeInsets.symmetric(vertical: 8),
          ),
          Container(
            color: Colors.grey,
            width: double.infinity,
            height: 100,
            margin: EdgeInsets.symmetric(vertical: 8),
          ),
          Container(
            color: Colors.grey,
            width: double.infinity,
            height: 100,
            margin: EdgeInsets.symmetric(vertical: 8),
          ),
          Container(
            color: Colors.grey,
            width: double.infinity,
            height: 100,
            margin: EdgeInsets.symmetric(vertical: 8),
          ),
          Container(
            color: Colors.grey,
            width: double.infinity,
            height: 100,
            margin: EdgeInsets.symmetric(vertical: 8),
          ),
          Container(
            color: Colors.grey,
            width: double.infinity,
            height: 100,
            margin: EdgeInsets.symmetric(vertical: 8),
          ),
          Container(
            color: Colors.grey,
            width: double.infinity,
            height: 100,
            margin: EdgeInsets.symmetric(vertical: 8),
          )
        ],
      ),
    );